In this article you will get an introduction to use the Section engine, and we will focus on using the section type 'Slidedeck'.
A slidedeck is a collection of content presented as - you got it - a slidedeck. It is a great feature to group related content into a collection. It can hold images, videos and text.
A slidedeck can have three different slide-types:
- Slide Advanced - add videochapters to videos and add sound-bites to your content
- Slide Text - A fullsize slide of text (as a powerpoint presentation)
- Slide Image - A image and descriptive text
When you add a slidedeck, you can add any number of slides to it.
A section is a contained piece of content, and it can be edited directly in the flow of your content, by clicking the edit-button next to each section. It can also be edited through the normal edit interface, and here you can drag and drop the order of your sections. Sections can be enabled or disabled at any time, allowing you to change your content instantly.
A slidedeck is constructed as a collection of content (slides), and each slide can, as you will see, itself contain a subset of content-pieces. Each subset can be edited directly from the content flow via the edit buttons.
Slide-type text
The slide-type text is the simplest slide. It only contains a rich text field. The slidedeck has a fixed height, so try to keep your content within the slidedeck height, or a scroll-slider will appear.
Slidetype - image
In the slide-type image you have an image upload field, a body field, a references field and a link field.
If you add content to either Body, Reference or Link - a right side of the slide will be created. By default the right side will be shown, but you can change this by marking the Collapse notes setting, and collapse the right-side.
By entering content in both the body field and reference field, two tabs will be created on the slide: Slide information and References. Since the space is scarce, this ensures that the you have the maximum amount of space for your content, and prevents creation of scrollbars when content is overflowing the container.
The link field will be displayed in the bottom of the Slide Information tab.
If you display the right-side by default, the image-space will be 795x450px - if you hide the right-side by default, the image-space will be 1170x450px - but it is recommendable that you upload your images in a higher resolution. When a slidedeck is viewet in fullscreen, it swaps low-res-images with high-res to adapt to large screensizes.


You can collapse right side by default
If you want to display the left side fullsize by default, you can choose the setting: Collapse notes


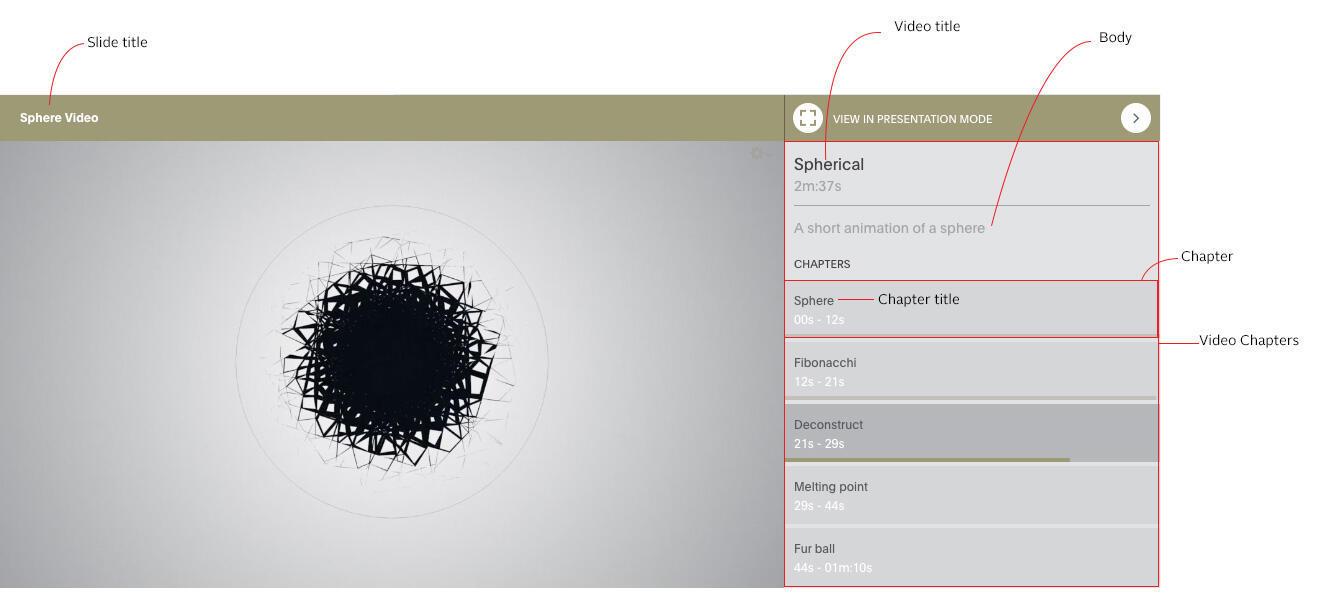
Slidedeck advanced - Video
The Slidedeck advanced gives you the extra possibility of adding sound and video to your slides.
When creating an advanced slide, you have the option to select the content in both the right-side and the left-side.
Slidedeck-left can have, as with the Slidedeck - image and Slidedeck Text slides, an image and text, but you can also add video.
Video Slides
When adding a video to the left slide, you can add Video Chapters to the right side, and split your video into browsable chapters. You can add a Video-title and a short description of the video and as many chapters you need.

Slidedeck advanced - Audio
You can add audiofiles to the right-hand side of an advanced slide.
Attach downloadable files to your slidedeck, and/or make all individual slides downloadable
You can upload files to download in the slidedeck field: ATTACHED FILES
If you select the slidedeck setting ''Make all individual slides downloadable" all image slides (and pdf slides) will be downloadable individually. The next slide in this slidedeck has an image, and the image is downloadable by clicking the download icon in the top/right corner of the slidedeck.
Slide-type PDF
The Slidedeck PDF converts a PDF into images and break the PDF-pages into slides.
By default all pages in the uploaded PDF is converted into slides, but you can choose exactly which pages you want to convert and display in the field Slidedeck PDF Pages. You can enter the specific pages or a range of pages you want to convert, and seperate them by a comma:
1-5,8,9,12-15 (dont use spaces)
Will convert the pages: 1,2,3,4,5,8,9,12,13,14,15
[[{"fid":"3165","view_mode":"teaser_large","fields":{"format":"teaser_large","field_file_image_alt_text[und][0][value]":"","field_file_image_title_text[und][0][value]":""},"type":"media","attributes":{"height":342,"width":380,"class":"media-element file-teaser-large"},"link_text":null}]]